

All types of wine storage structures need a dependable wine cellar cooling system installed. The best refrigeration equipment for each wine room varies, depending on a number of factors, including the dimensions of the facility, the cellar’s bottle capacity, and the climate of the region. M&M Cellar Systems, one of the long-time members of Wine Cellar Designers Group, has a ton of experience in setting up a wide range of wine cellar refrigeration units. In a recent project they completed in Los Angeles, their team takes us through how to install a split system cooling unit.
What is the Ideal Role of a Wine Cellar Cooling Technician?

Mario Morales is a member of the Wine Cellar Designers Group and an expert in wine cellar cooling systems.
Mario Morales, the owner, designer, and lead technician at M&M Cellar Systems, has had years of experience in installing all kinds of refrigeration systems for wine storage facilities all over California. In his line of work, he says that it is important for a technician to go beyond being just as installer of an equipment. A good wine cellar cooling technician is one who is able to assess a wine room thoroughly and be able to recommend the best cooling unit for it.
Mario and his team had recently completed an installation project in Los Angeles. In this project, Mario was able to install a split system cooling unit in a residential wine cellar.
Why Was a Split System Cooling Unit the Best Equipment to Install in the Los Angeles Home Cellar?

Residential wine cellar where Mario’s team installed a split system cooling unit.
A prudent wine cellar cooling technician chooses refrigeration equipment only after checking the necessary factors. Our team chose to install a split system cooling unit in the Los Angeles project because of the following considerations:
1. Not Enough Space on the Cellar’s Ceiling for Any Other Kind of Wine Cellar Refrigeration Equipment
The wine cellar was located on the first floor of the client’s two-story house. The space between the first and second floor was very narrow, which means that the ceiling of the wine cellar could was not suitable for any large equipment installation.

Evaporator coil installed in the wine cellar ceiling.
2. The Wine Cellar was Located at the Center of the Client’s Living Space
Noise was a very important consideration. The team could not install any refrigeration system that would be noisy. A split system meant that the noisy component of the equipment would be installed outside, and only the quieter parts would be installed inside the cellar.
In some cases, a self-contained unit would have been another option, since this type isn’t noisy as well. But they did not choose a self-contained system because there was no room that could be used for hot air exhaust. Self-contained units required having an adjacent room where it could vent out hot air. Since the wine cellar was located in the middle of the client’s living space, the installation of a self-contained unit would mean exhausting hot air into the client’s living space.
A Step by Step Guide on How to Install a Split System Cooling Unit
After all the factors considered, Mario’s team decided to install two evaporator coils inside the cellar and one condenser unit outside the house. This split system cooling unit was the most appropriate refrigeration equipment for this Los Angeles residential wine cellar.
Step 1: Setting Up a Concrete Pad
Outside the client’s house, the team chose a location where they planned to setup the condenser unit. When they’ve selected a spot, they laid down a concrete pad where the condenser will be mounted.
Step 2: Configure the Split System Cooling Unit’s Line Set
The line set is what connects the condenser to the evaporator coils.
Step 3: Establish the Power Source
Some cities require disconnect switches as the split system cooling unit’s power source, while others allow just an outlet. In this particular project, they installed disconnect switches right above the line set.
Step 4: Install the Evaporator Coils
The team mounted twoCTI-35 evaporator coils. These were mounted into the recessed soffit in the ceiling of the residential wine cellar. Ideally, they would have installed one huge evaporator coil, but with the limitations of space, they opted to use two smaller coils that could provide the equivalent cooling capacity.
They also installed an access port, which will be useful later on during the pressure test that will be performed in Step 7.
Step 5: Configure the Condensation Pump and Drain
The split system cooling unit in this project had draining pans located right below the evaporator coils. These pans collect all condensation and bring them to the primary drain.
Most wine cellar cooling systems come with a mini condensate pump, which are included by their manufacturers. They didn’t use the pump that came with this project’s unit. Instead, they used a gravity drain. If a project allows the use of a gravity drain, Mario highly recommends doing so. If not, the mini condensate pump may be used or install a standard condensate pump.
Step 6: Set Up the Enclosure
The team mounted a stainless-steel platform on top of the concrete pad they set up on step 1. This would be the platform for the stainless-steel enclosure. This enclosure is then soldered on all sides, so that the wine cellar cooling equipment is completely sealed protected.
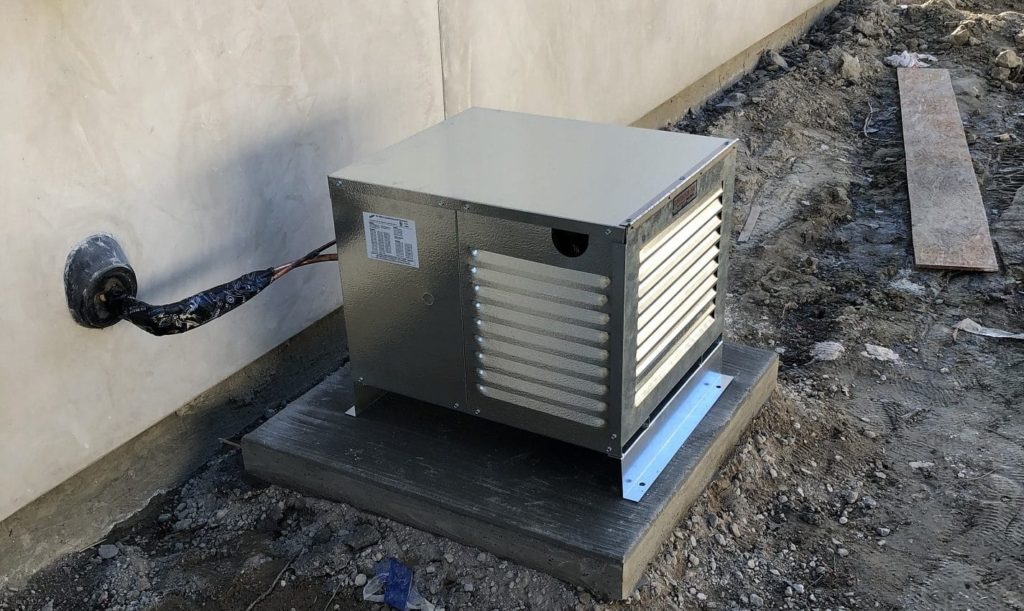
Condenser installed outside the client’s house.
Step 7: Perform a Pressure Test to Check for Leaks
A pressure test has to be performed in all installation projects. This is to ensure that there are no leaks in the cooling system. Mario and his team used 200 psi of nitrogen in this project’s pressure test.
The access port that they installed in Step 4 allows them to compare the pressure at the evaporator inside versus the pressure at the condenser outside. Without the access port, the technician would have to go back and forth from the evaporator and condenser unit. The absence of an access port would not only mean inconvenience for the technician, but also inaccurate pressure reading.
Install A Split System Cooling Unit in Your Cellar! Hire an Expert!
The process of installing a wine cellar cooling system might seem like something you could do by yourself. However, any mistake in the installation process could mean a poorly functioning refrigeration system. Consequently, a faulty cooling system could have detrimental effects to the wines in your cellar. Seek the help of an expert if you need to install a split system cooling unit in your wine cellar. Give them a call today! Dial +1 (310) 734-8837!